You have probably seen those dreamy backyard patios on social media. Perfectly contained pea gravel, a couple of Adirondack chairs, and string lights overhead.
But here is the thing nobody talks about. The edging does most of the heavy lifting. Without a solid border, your gorgeous pea gravel slowly wanders across the yard like it has somewhere better to be.
The good news is that choosing and installing the right pea gravel patio edging ideas is one of the most satisfying DIY projects you can tackle in a single weekend. You do not need fancy tools or a contractor. You just need a little know-how and some creative thinking.
| Edging Material | Cost per Linear Foot | Durability | Best Style Match | DIY Difficulty | Maintenance |
|---|---|---|---|---|---|
| Steel or Aluminum Strip | $3 to $8 | Very High | Modern, Minimalist | Moderate | Low |
| Brick | $2 to $6 | High | Traditional, Cottage | Moderate | Low |
| Natural Stone | $5 to $15 | Very High | Rustic, Mediterranean | Hard | Low |
| Pressure Treated Wood | $1 to $4 | Moderate | Casual, Farmhouse | Easy | Medium |
| Concrete Pavers | $2 to $5 | High | Versatile for any style | Moderate | Low |
| Living Plant Edge | $1 to $3 for plants | Moderate | Cottage, English Garden | Easy | High |
| Corten Weathering Steel | $8 to $15 | Very High | Industrial, Contemporary | Moderate | Very Low |
| Recycled Composite | $3 to $7 | High | Eco Friendly, Modern | Easy | Low |
| Gabion Baskets | $10 to $20 | Very High | Industrial, Architectural | Hard | Very Low |
| Poured Concrete Curb | $5 to $10 | Very High | Clean, Contemporary | Hard | Very Low |
Why Edging Matters More Than You Think
Let me be honest with you. Pea gravel without edging is chaos waiting to happen. Those smooth, rounded stones sit between an eighth and three eighths of an inch in diameter. They roll everywhere once foot traffic, rain, or wind hits them.
Good edging does three important jobs at once.
- It keeps every stone inside the patio area where it belongs.
- It creates a crisp line that separates the patio from the lawn, garden beds, or walkways around it.
- It gives the whole space a finished and intentional look instead of something that seems random.
Think of edging as the picture frame around a painting. The painting might be beautiful on its own, but the frame is what makes it look like it belongs on the wall.
Steel and Aluminum Edging for a Sleek Modern Choice
If you love clean lines and a contemporary feel, steel or aluminum edging is your best bet. These thin metal strips bend smoothly around curves and sharp angles. They give you precise control over the shape of your patio.
Once you install them, they almost disappear. You see gravel on one side and lawn on the other, with just a slim edge peeking through.
Here is why homeowners love this option.
- It is incredibly strong and does not buckle under pressure.
- It handles freeze and thaw cycles without warping.
- It keeps gravel locked in place for years.
- It needs practically zero maintenance.
Installation is straightforward. You dig a narrow trench along your patio perimeter, set the strip so about half an inch sits above the gravel surface, and secure it with stakes on the outside. Most kits include connectors to link multiple strips together.
One important tip is to make sure the top of the metal edge sits just slightly above the finished gravel level. This subtle lip stops stones from rolling over without creating a tripping hazard.
Brick Edging for a Timeless and Versatile Look
There is a reason brick has been a go-to landscaping material for centuries. It just works. Brick edging gives your pea gravel patio that classic, put-together look that pairs well with colonial homes, cottage gardens, and traditional architecture.
What makes brick fun for DIYers is the range of layout options you can try.
- A flat single row gives you a low profile and understated border.
- Standing bricks upright creates a bolder visual statement with more height.
- Angling them at 45 degrees in a sawtooth pattern adds texture and decorative interest.
- Stacking double rows creates a raised border that can double as a mini seat wall.
Brick holds up extremely well over time against foot traffic, weather, and UV exposure. The earthy red and brown tones go nicely with the natural color palette of pea gravel.
For installation, set your bricks into a shallow trench on a compacted sand base. You can mortar the joints for a permanent border. Or you can dry set them without mortar for a project you can adjust later. Dry setting is more forgiving for first time DIYers and still provides excellent containment.
Natural Stone Edging for an Organic High End Look
If you feel drawn to a rustic or Mediterranean vibe, natural stone edging delivers a look that is hard to beat. Irregular fieldstones, flagstone pieces, or stacked river rocks create a border that feels like it grew out of the landscape.
The beauty of natural stone is its variety. No two pieces look the same, so the edge has a handcrafted quality that mass produced materials simply cannot replicate.
Here are a few style pairing ideas to consider.
- Warm toned sandstone with tan pea gravel creates a desert inspired patio.
- Cool gray slate with white and gray gravel gives you a coastal feel.
- Mixed fieldstone with earth toned gravel brings out rustic cottage charm.
Stone is also heavy, and that is actually an advantage here. The weight keeps each piece firmly in place without stakes or adhesive. You just set the stones into a shallow trench, pack soil behind them, and let gravity handle the rest.
The trade off is that natural stone costs more and takes patience to install. You will spend time fitting irregular shapes together like a puzzle. But the end result looks like it belongs in a design magazine.
Pressure Treated Wood and Timber Edging on a Budget
Wood edging is one of the most affordable and beginner friendly options on this list. Landscape timbers, cedar planks, or pressure treated lumber can frame your patio for just a few dollars per linear foot.
Here are the best wood choices for edging.
- Cedar is naturally resistant to rot and insects. It does not need chemical treatments.
- Pressure treated pine is cheaper and widely available. Just make sure it has a ground contact rating.
- Railroad ties give you a chunky, rustic look. But they are very heavy and can leach chemicals over time.
To install wood edging, dig a trench deep enough that roughly half the timber sits below the ground. Drive rebar stakes through pre drilled holes every three to four feet for extra stability. That is all you need for a border that will stay put.
The main trade off with wood is ongoing maintenance. Even treated lumber shows wear from moisture exposure over time. Plan on resealing or replacing sections every five to seven years depending on your climate. Still, the low initial cost and easy installation make wood a solid choice for anyone working with a tight budget.
Corten Weathering Steel Edging as the Designer Secret Weapon
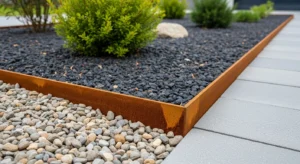
Here is an edging material most guides skip entirely, and that is a shame. Corten steel, also known as weathering steel, develops a rich rust colored patina over time. That patina actually protects the metal beneath from further corrosion.
The result is an edging strip that gets more beautiful as it ages.
Landscape architects love Corten because it bridges the gap between industrial and organic. That warm orange brown tone pairs beautifully with the earthy palette of pea gravel, and the material can last decades without any maintenance at all.
Here is what makes it stand out.
- It develops a unique and evolving patina over the years.
- It is extremely durable with zero upkeep.
- It creates a high end, architectural look.
- It installs the same way as standard steel edging.
The only real downside is cost. Corten runs significantly more per linear foot than regular galvanized steel. But if you want a premium look without pouring concrete, it is worth the investment.
Living Plant Edges That Are Soft Green and Full of Character
Who says edging has to be hard and rigid? A living plant border brings color, fragrance, and texture that no metal strip or stone can match.
Here are the best plants for pea gravel patio edges.
- Creeping thyme releases a pleasant scent when you walk on it and tolerates light foot traffic.
- Lavender adds purple color and fragrance all summer long.
- Catmint grows low, handles drought well, and attracts pollinators.
- Low boxwood gives you a formal and neat hedge with serious English garden energy.
- Ornamental grasses add wispy, natural movement and texture.
The catch with living edges is maintenance. Plants need watering, trimming, and occasional replacement. They also take time to fill in, so your border will not look fully established on the first day.
But if you are willing to invest a little ongoing care, the payoff is a patio edge that is alive, evolving, and completely unique to your yard.
Gabion Baskets for a Bold Industrial Statement
Gabion baskets are wire cages filled with stones. They have jumped from commercial landscaping into residential design in a big way. Short gabion walls along your pea gravel patio create a bold statement that can double as seating, a planter base, or even a privacy screen.
Here are some fill options for gabion edges.
- Matching pea gravel gives you a cohesive look.
- Contrasting river rock adds visual pop.
- Broken concrete creates an urban recycled aesthetic.
- Recycled glass pieces bring in a splash of color.
Gabion edging works best on larger patios where its bulky profile does not overwhelm the space. On compact patios it can feel heavy handed, so scale accordingly.
Installation is more involved than most other options. You need to level a solid base and assemble the wire frames. But the visual impact is hard to argue with.
Poured Concrete Curb as the Permanent Solution
If you want a set it and forget it edging solution, a poured concrete curb is about as permanent as it gets. Once it cures, it stays there for life. No shifting. No settling. No escaping stones.
Here are some design possibilities with concrete curbs.
- You can pour them in straight lines, gentle curves, or freeform organic shapes.
- You can stamp patterns into the surface for decorative texture.
- You can add color tint during the mix for a custom shade.
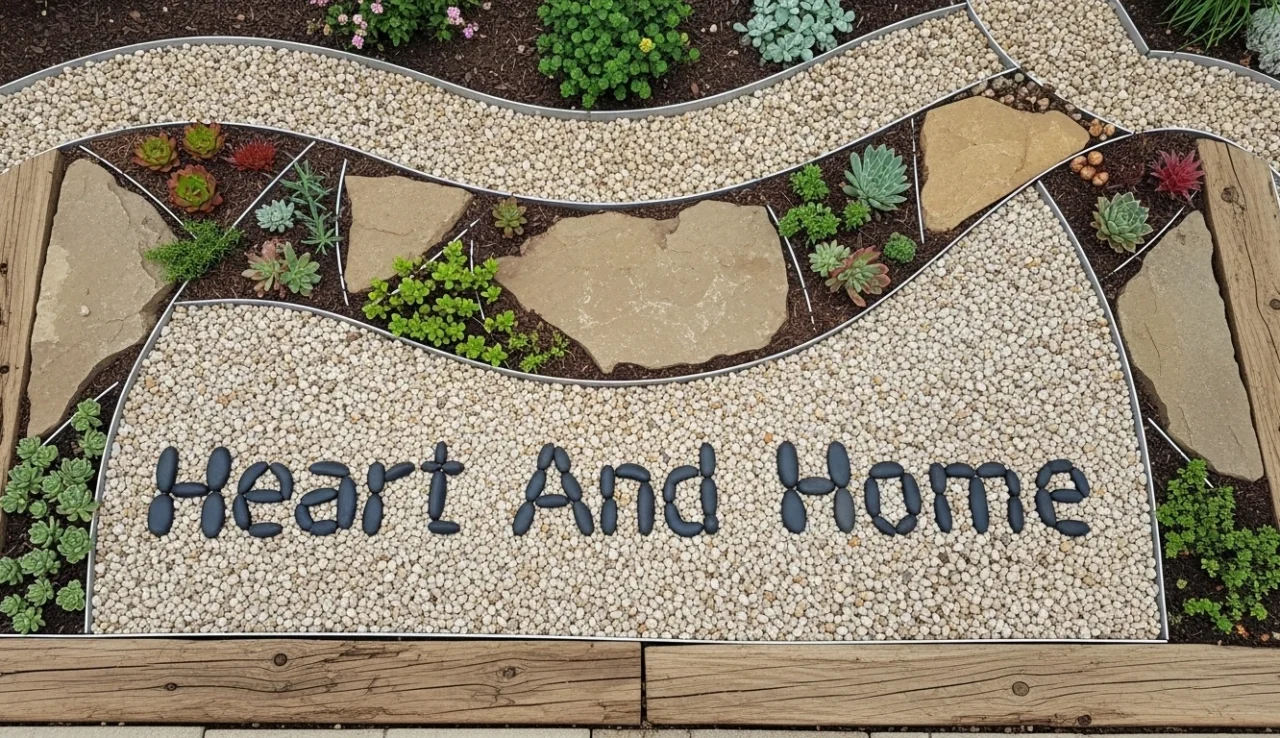
- You can press decorative pebbles or glass into the surface while it is still wet.
The downside is that concrete requires more skill and preparation than other edging types. You need to build forms, mix and pour the concrete, and finish it before it sets.
It is absolutely doable as a DIY project. But block out a full day for the work and give the concrete a weekend to cure before you pour the gravel.
Recycl and Composite Edging as the Eco Conscious Option
If sustainability matters to you, recycled composite edging deserves a look. These products use recycled plastics, rubber, or a blend of reclaimed wood fibers and polymers. They mimic the appearance of wood or stone without requiring any new raw materials.
Here is why composite works well.
- It does not rot, split, or attract insects like natural wood.
- It handles moisture without breaking down.
- It is flexible enough to curve around organic shapes.
- Many systems use interlocking connections for tool free installation.
- It comes in earthy tones that blend well with pea gravel.
Composite edging is not as visually striking as Corten steel or natural stone. But if you want something low maintenance, affordable, and environmentally responsible, it checks every box.
Installation Guide for Any Edging Material
No matter which pea gravel patio edging idea you choose, the basic process follows the same pattern. Here is a walkthrough that works for virtually every material on this list.
Mark Your Patio Perimeter:
Use a garden hose, spray paint, or stakes and string to outline the exact shape. Take your time with this step. Once the edging goes in, changes get a lot harder. Step back and check the shape from several angles, including from inside the house through any windows that overlook the space.
Dig the Trench:
Excavate four to six inches deep along the entire perimeter. Make the trench wide enough to comfortably fit your chosen edging material. Keep the excavated soil nearby because you will use some of it for backfilling later.
Lay Landscape Fabric:
Roll weed barrier fabric across the entire patio area and extend it slightly into the trench. Overlap seams by at least six inches and secure everything with landscape staples.
Install Your Edging Material:
Set the edging into the trench so the top sits about half an inch above where the finished gravel surface will be. Secure it with stakes or backfill soil or both, depending on the material. Use a level frequently to keep the border height consistent all the way around.
Prepare the Base:
If your soil is soft or sandy, spread two to three inches of crushed stone inside the patio area and compact it with a hand tamper. This gives the pea gravel a stable foundation and improves drainage.
Pour and Level the Pea Gravel:
Spread gravel two to three inches deep across the patio. Rake it evenly and pay extra attention near the edges. Walk across the surface or use a tamper to settle the stones, then add more gravel to any low spots.
Maintenance Tips to Keep Your Edging Looking Sharp
A well built pea gravel patio needs surprisingly little upkeep. But a few regular habits make a big difference over time.
- Rake every few weeks to redistribute stones that have shifted from foot traffic and keep the surface uniform.
- Check edging once a season for movement, frost heave, or wear. Fix small issues before they grow into bigger problems.
- Reseal wood edging every couple of years to prevent moisture damage.
- Trim plant edges throughout the growing season to keep them neat and tidy.
- Top off gravel once a year. A bag or two freshens the whole patio and fills thin spots.
- Brush debris off metal and stone borders to keep the lines crisp and clean.
Final Thoughts
Picking the right edging for your pea gravel patio shapes the entire feel of your outdoor space. A slim steel strip says modern. Weathered brick says classic. A living border of lavender says welcoming. Almost every option on this list is a weekend DIY project with tools you probably already own. So grab your favorite material, block out a Saturday, and give your backyard the upgrade it has been waiting for.