Have you ever looked at the empty space under your bed and thought, “That’s a lot of wasted real estate”? You’re not wrong.
A queen bed frame with storage can open up roughly 30 cubic feet of hidden space. That’s almost half a linen closet, and it won’t eat up a single extra inch of floor space. You can build one yourself for a fraction of what furniture stores charge.
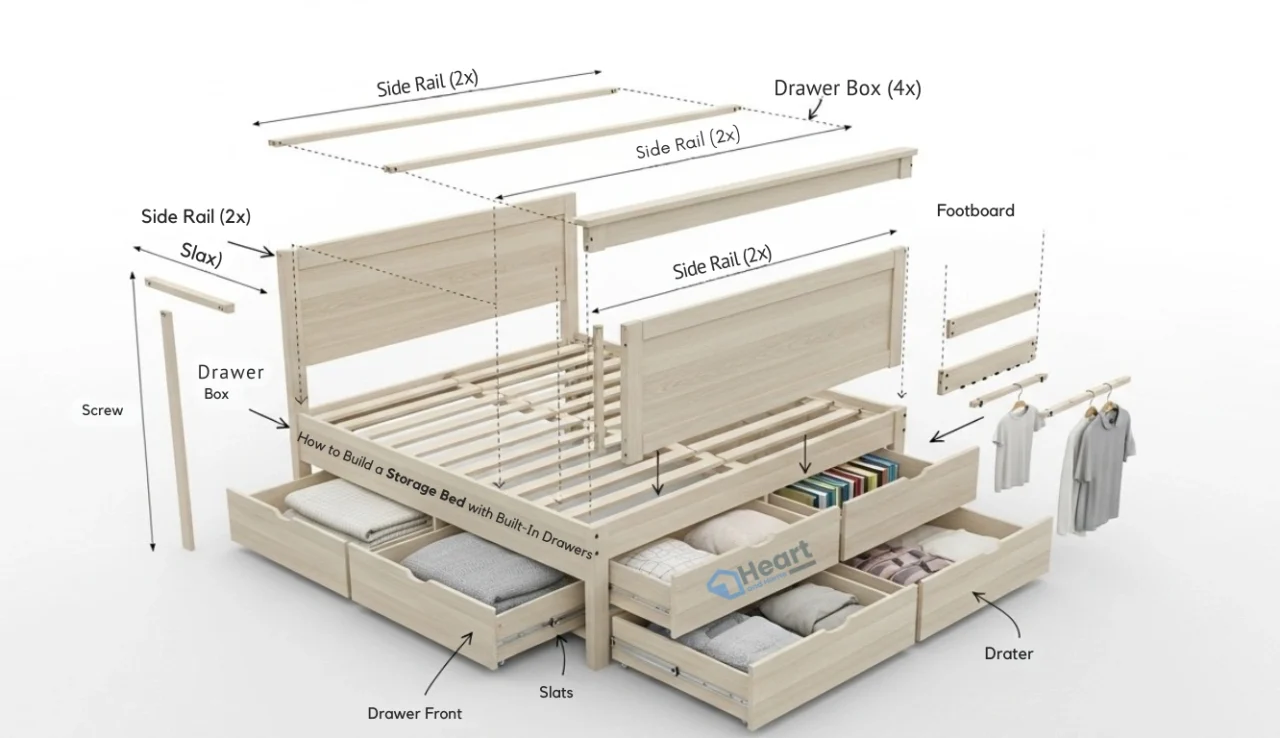
I walk you through every step of building a storage bed with built-in drawers. Whether you want a king bed frame with storage for the master bedroom, a twin bed with storage for your kid’s room, or a full size bed frame with storage for a guest room, the process stays the same.
You’ll pick up techniques that other guides leave out, including modular assembly for easy moving, long-term internal storage compartments, and how to add a lift-up storage section alongside your drawers.
Why Build a Storage Bed Is Worth Your Weekend
Bedroom storage is a constant battle, especially in smaller home design and apartments. Dressers take up precious floor space. Closets only hold so much. And those flimsy under bed storage bins from the dollar store? They’re not a long-term solution.
A well-built platform bed with storage can replace part of your dresser while keeping everything hidden and dust-free. Unlike rolling under bed storage containers that slide around and collect dust, built-in drawers on proper slides work like real furniture.
Now here’s the money part. A comparable storage bed queen size from a retail store costs anywhere from $800 to over $2,000. Building your own? You’re looking at roughly $250 to $550, depending on wood selection and bed size. Plus, you get full control over the design, the dimensions, and the finish.
Storage Bed Types: Which Design Is Right for You?
Before you start building, it helps to understand the different styles of storage beds out there. Each design brings its own strengths to the table.
| Bed Type | Storage Style | Skill Level | Best For |
|---|---|---|---|
| Platform storage bed with side drawers | Drawers in side rails | Intermediate | Most bedrooms, clean look |
| King size platform bed with cubbies | Open shelves and drawers | Intermediate to Advanced | Large bedrooms, max storage |
| Lift up storage bed | Hydraulic lift mattress platform | Advanced | Small rooms, bulk bedding storage |
| Bed frame with storage underneath | Open underneath with bins | Beginner | Renters, temporary setup |
| Captain’s bed or kids storage bed | Drawers and shelves all around | Intermediate | Kids’ rooms, twin or full size |
| IKEA-style storage bed hack | Repurposed drawer units as base | Beginner to Intermediate | Budget builds, apartments |
Tools and Materials You’ll Need
Gather everything before you start. Nothing kills momentum like three trips to the hardware store in one afternoon.
| Tool | Purpose |
|---|---|
| Table saw or circular saw with guide | Cutting plywood and lumber |
| Drill and driver with bit set | Screws and pilot holes |
| Pocket hole jig (Kreg or similar) | Strong, hidden joints |
| Tape measure | Measuring everything twice |
| Speed square | Square cuts and assembly |
| Corner clamp jigs | Holding pieces at 90 degrees |
| Random orbital sander | Smoothing before finishing |
| Jigsaw | Cutting handle openings |
| Level | Checking everything sits flat |
| Brad nailer (optional) | Attaching trim and bottoms |
Materials (Queen Bed Frame with Storage)
| Material | Quantity | Notes |
|---|---|---|
| 3/4 inch plywood sheets (4×8) | 4 to 5 sheets | Birch for paint, oak for stain |
| 1/2 inch plywood | 1 to 2 sheets | Drawer bottoms and backs |
| 2×4 lumber | 6 to 8 pieces | Internal framing and support |
| 1×3 or 1×4 lumber | 8 to 10 pieces | Face frames, trim, slats |
| Full-extension drawer slides | 4 to 6 pairs | Ball-bearing type, 16 to 18 inch length |
| Bed rail brackets | 4 pairs | For easy assembly and disassembly |
| Wood screws (assorted sizes) | 1 box | Coarse thread works best for plywood |
| Wood glue (Titebond II or III) | 1 bottle | Use on every joint |
| Brad nails (1 and 1/4 inch) | 1 box | For trim and drawer bottoms |
| Sandpaper (120 and 220 grit) | Several sheets | Surface prep |
| Primer and semi-gloss paint | As needed | Or stain plus polyurethane |
| Iron-on edge banding | 1 roll | Covers raw plywood edges |
| Drawer pulls or knobs | 4 to 6 pieces | Or cut finger pulls instead |
| Felt furniture pads | 1 pack | Protects your floors |
Plan Your Bed Dimensions and Drawer Layout
This is the most important step. If you rush through it, everything else gets harder.
Start by picking your mattress size.
Standard Mattress Sizes:
| Mattress Size | Width x Length | Common Use |
|---|---|---|
| Twin | 38 x 75 inches | Kids’ rooms, bunk beds with storage |
| Twin XL | 38 x 80 inches | Teens, loft bed with storage |
| Full | 54 x 75 inches | Guest rooms, full bed with storage |
| Queen | 60 x 80 inches | Master bedrooms, queen bed storage bed |
| King | 76 x 80 inches | Large bedrooms, king bed with storage |
| California King | 72 x 84 inches | Narrow or long bedrooms |
Build your frame about half an inch wider and half an inch longer than the mattress. That small gap gives you enough room to tuck in sheets without jamming the mattress in tight.
Drawer Placement Tips:
Here’s the layout detail most guides skip over:
- Only place drawers on the footboard half of each side. Nightstands will block headboard-side drawers from opening.
- Map your entire room layout first. Check clearance for doors, closets, and walking paths.
- For a queen size bed with storage, four large drawers (two per side) works best.
- For a king size bed frame with storage, go with six drawers or mix drawers with open cubbies on one side.
Sketch everything on paper or use free software like SketchUp. Include overall dimensions, drawer sizes, and divider locations.
Cut the Plywood and Lumber
Time to make some sawdust.
Large plywood sheets feel awkward and intimidating. Here’s a pro trick that makes it way easier. Lay the full sheet on rigid foam insulation on the floor and cut right there with a circular saw. The foam supports the plywood across its full surface, your pieces won’t crash to the ground, and the blade runs right through the foam without any issue.
A Time-Saving Tip Most Builders Miss:
Paint your full plywood sheets before you cut them down. I know it sounds backwards, but rolling paint onto a flat 4×8 sheet takes about five minutes. Painting 30 or more small individual pieces? That takes forever. You’ll still need to do some touch-up work later, but this approach cuts your finishing time way down.
Cutting Order:
- First, cut the side panels for the bed frame.
- Second, cut the internal dividers for structural support.
- Third, cut the top platform pieces that hold up the mattress.
- Fourth, cut drawer parts. Use 3/4 inch plywood for the sides, fronts, and backs. Use 1/2 inch plywood for the bottoms.
Make drawers about 1 inch narrower than their openings. That gap accounts for the drawer slide hardware on each side.
Label every single piece with a pencil as you cut. Once you have 30 or more pieces of plywood lying around, they all start looking the same.
Build the Modular Bed Frame Section
Here’s where this guide goes beyond what most other tutorials cover. The smartest way to build a storage bed frame is in separate sections, not as one giant piece.
Why does this matter? Because a fully assembled king platform bed with storage won’t fit through any standard doorway. When you build in sections, you can carry each piece through doors, up staircases, and into your bedroom without any drama. You can also take the whole bed apart if you move someday.
Think of Your Bed as Three Separate Boxes:
- The left side section, which is a low cabinet with drawer openings.
- The right side section, which mirrors the left.
- The front section at the footboard, which connects the two sides together.
Each side section is basically a short bookshelf lying on its side.
Assembly Steps:
Start with the side boxes. Attach internal dividers to the top and bottom panels using wood glue and screws. Always drill pilot holes in plywood before driving screws. Plywood splits very easily without them, and one cracked board can ruin your whole panel.
Use corner clamp jigs to hold everything at a perfect 90 degrees while you drive screws. If your boxes aren’t square, your drawers won’t slide right later on.
A Secret Internal Storage Trick:
When you build the front section, leave the back panel open. This clever little design move lets you pull out the front drawers entirely and reach deep internal storage behind them, all without lifting the mattress. Think of it as secret storage in bed that nobody ever sees. It’s perfect for winter clothes during summer, or the other way around.
Connect all three sections with bed rail brackets at each corner. These brackets simply hook together, and they make assembly a five-minute job.
Add Toe Kicks and a Solid Base
This detail separates a beginner-looking storage bed from one that looks like real furniture.
Toe kicks are small recessed panels along the bottom of each section. They’re typically 3 to 4 inches tall and sit back about 2 inches from the front face. They serve two important purposes:
- They stop you from stubbing your toes every time you get in and out of bed.
- They give the bed a polished, built-in look that hides the gap between the frame and the floor.
Without toe kicks, your storage bed frame looks like a stack of boxes on the floor. With them, it looks like it belongs in a furniture showroom.
How to Build Them:
- Glue and screw the toe-kick pieces to the bottom of each section.
- Attach support blocks that sit flush with the tops of the toe kicks. Place one at each end and one in the center.
- These blocks spread the weight evenly and keep things from sagging over time.
This step matters even more with a heavy king size bed with storage that you plan to load up with clothing and bedding.
Build the Drawers
This is the most satisfying part of the whole project. Everything really starts to come together here.
Each drawer is a small open-top box. The construction is simple, but the details matter.
Drawer Assembly Order:
- Glue and nail the sides to the bottom panel first.
- Then attach the back piece.
- Check for square after every step.
- Use your corner clamp jigs again. They’re just as valuable here as they were on the main frame.
Choosing Your Drawer Face Style:
You have two solid options here.
The first option is separate face panels that overhang the drawer box slightly. This approach hides gaps, works well for beginners, and gives a clean, finished look.
The second option is to let the front wall of the drawer box serve as the visible face. This method is simpler but less forgiving if your measurements are a little off.
Want a Modern Look Without Visible Hardware?
Cut out finger-pull openings in each drawer face. Mark the center, trace a 5 to 6 inch horizontal opening, drill a starter hole, and cut it out with a jigsaw. Sand the edges smooth and you’ve got built-in handles. Without knobs, the drawers just look like clean trim panels on the side of the bed.
Building for Kids?
If you’re making a kids bed with storage or a twin bed frame with storage, keep these tweaks in mind:
- Make drawers a bit shallower so younger kids can pull them open without straining.
- Use soft-close drawer slides to protect little fingers from getting pinched.
- Round off the edges on drawer faces for safety.
Install the Drawer Slides
Drawer slides will make or break this entire project. Go with full-extension ball-bearing slides. They cost more, yes. But the difference you’ll feel every single morning is massive.
Full-extension means the drawer comes all the way out so you can reach everything inside. With partial-extension slides, the back third of every drawer turns into a black hole where things disappear.
The Perfect Alignment Method:
Here’s the approach that gets it right every time:
- Mount the cabinet half of each slide to the inside of the bed frame first.
- Use a 3/4 inch spacer block to position the slide so it clears the face frame.
- Keep both halves of the slide together during installation.
- Set the drawer box on a thin spacer at the bottom of the opening. A paint stir stick works great for this.
- Pull out the drawer half and screw it directly to the drawer box.
- Because the two halves are still connected to each other, the alignment happens automatically.
Test every drawer multiple times. Open, close, open, close. Fix any slides that bind or rub before you move on. Spending five minutes per drawer now saves years of frustration down the road.
Assemble the Full Bed Frame in Your Bedroom
Now comes the exciting part. Time to bring it all together.
Carry each modular section into your bedroom one at a time. This is exactly why you built the bed in pieces. Set the side boxes where the bed will live, then bring in the front section.
Connection and Leveling:
- Hook the bed rail brackets together at each corner.
- Drive connecting screws from inside the drawer openings, where they’ll never show.
- Check with a level. If your floor isn’t perfectly flat, use shims under the toe kicks.
How to Install the Mattress Slats:
Run cleats along the inside top edges of the frame. Then cut slats from standard 1×4 boards.
- Space the slats about 2 to 3 inches apart.
- Secure each slat with two screws on each side.
- Use one slat as a spacer to keep the gaps consistent.
Why Slats Are Better Than Solid Plywood:
Good airflow under the mattress is something most guides don’t even mention, but it makes a real difference. Without proper ventilation, moisture gets trapped between the mattress and the platform. That leads to mildew and a musty sleeping surface. Slats are a much better choice than solid plywood, especially if you live somewhere humid.
Add a Lift-Up Storage Compartment (Bonus Feature)
This is a step that none of the top competitor articles cover in any real detail. And honestly, it’s a game-changer.
Instead of making the entire bed top a fixed surface, build a lift-up storage section at the foot. You’ll get the benefits of a lift up storage bed combined with a drawer bed, all in one frame.
How It Works:
- Split your top platform into two pieces. One is a fixed section over the headboard area where you actually sleep. The other is a hinged section at the foot.
- Attach the hinged piece with a piano hinge along the shared edge.
- Leave about an eighth of an inch gap between the two pieces so the lid opens without binding.
- Add a lid-stay hinge or support arm to keep it propped open safely. Nobody wants a heavy plywood lid dropping on their hands.
What to Store Inside:
This deep compartment is perfect for the kind of stuff you don’t need every day:
- Spare comforters and seasonal bedding storage items.
- Sleeping bags and camping gear.
- Luggage you only pull out a few times a year.
- Extra blankets and pillow sets.
When you combine this with your side drawers, you end up with a bed with storage that rivals a walk-in closet.
One more important detail: add an extra internal divider where the fixed and hinged sections meet. This divider supports both the edge of the fixed top and the piano hinge. It prevents any flex or bounce when you sit on the end of the bed.
Build a Matching End-of-Bed Storage Bench (Bonus Feature)
Here’s another step you won’t find in competitor guides, and it really ties the whole project together.
An end of bed storage bench gives you extra seating and even more hidden storage. It works especially well with a queen bed with storage drawers or a king bed frame where the footboard area has room to spare.
How to Build It:
- Build a simple rectangular box the same width as your bed frame. Make it about 18 inches tall and 16 inches deep.
- Attach a hinged top and pad it with 2 inch foam and upholstery fabric.
- The inside gives you a perfect spot for extra pillows, bedding storage, or under bed shoe storage overflow.
Why It’s Worth the Extra Effort:
This bench does three jobs at once:
- It gives you a place to sit while you put on your shoes each morning, like a real bed storage bench.
- It hides items you use throughout the week.
- It finishes the look at the foot of the bed and gives the whole setup a polished feel.
Attach the bench to the main bed frame with a couple of L-brackets so it doesn’t slide around when someone sits down. You can also build this as its own separate piece. An end of bed bench with storage is useful in any bedroom, even without a matching bed frame.
Sand, Prime, and Paint for a Professional Finish
You’re almost at the finish line now.
Surface Prep:
- Fill all visible screw holes, seams, and plywood edge gaps with wood filler.
- Let it dry completely before touching it.
- Sand with 120 grit to knock down the filler and smooth out rough spots.
- Follow up with 220 grit for a silky surface.
Edge Treatment:
Apply iron-on edge banding to all exposed plywood edges before you paint. Raw plywood edges soak up paint unevenly and always look rough, no matter how many coats you put on. Edge banding takes about ten minutes with a household iron and it makes a huge difference.
Painting Tips:
- Start with one coat of high-bonding primer. Zinsser BIN Shellac primer sticks to everything, including IKEA laminate if you’re doing a hybrid IKEA storage bed hack.
- Roll on two coats of semi-gloss latex paint.
- Use a small foam roller for flat surfaces. It gives the smoothest finish with no brush marks.
- Use a small angled brush for corners and tight spots.
- Keep your coats thin and even. One thick coat always looks worse than two thin ones.
Prefer a Natural Wood Look:
Skip the paint entirely. Apply stain with an old rag, working along the grain. Wipe off the excess and let it dry for 24 to 72 hours between coats. Then put on two or three coats of water-based polyurethane to protect the surface. Always work in a room with good ventilation.
Organize Your New Storage Space
Attach your drawer pulls, slide those drawers in one last time, and take a step back. You just built a custom piece of furniture that solves a real problem in your home.
Now let’s make the most of all that new space. Here’s how to organize your beds with storage underneath:
- Side drawers (the ones you reach every day): folded clothes, pajamas, workout gear, linens, and frequently worn shoes.
- Lift-up compartment (seasonal stuff): spare comforters, sleeping bags, seasonal clothing, and luggage.
- End-of-bed bench (weekly access): throw pillows, blankets for movie nights, and current-season accessories.
Smart Extras to Add:
- Drop a few cedar blocks inside the drawers to keep clothing smelling fresh.
- Stick felt furniture pads on the bottom of the bed to protect your floors.
- Use fabric drawer dividers or small under the bed storage containers to keep categories separated inside the larger drawers.
- Save silica gel packets from shoe boxes and toss them in closed drawers to control humidity.
Alternative Approaches Worth Knowing
The IKEA Hack Storage Bed:
Some builders grab IKEA drawer units like the MALM or NORDLI series and use them as the base. Then they build a custom frame around them. This IKEA bed with storage approach saves a lot of time on drawer construction since the drawers and slides come ready to go. It’s a great option if you want beds with storage underneath but you don’t have a fully equipped workshop. Some people have even recreated the popular IKEA Malm storage bed look for a lot less money this way.
The Repurposed Dresser Storage Bed:
Here’s an even cheaper approach. Grab two old dressers and cut them down to the right height. Use them as the two side sections of your bed frame. This kind of upcycled bed frame with storage underneath costs almost nothing if you find the dressers secondhand. It works especially well for a kids bed with storage or a toddler bed with storage upgrade.
Day Bed and Sofa Bed Variations:
The same drawer-building techniques from this guide apply to a day bed with storage or a sofa bed with storage. The construction is nearly the same. You just adjust the height and add a backrest panel. A twin platform bed with storage makes an excellent daybed for a home office that doubles as a guest room.
Final Thoughts
Building a storage bed with built-in drawers is one of those rare projects that pays for itself the moment you finish. You get massive hidden under bed storage, you can ditch extra furniture, and you end up with something that fits your room perfectly. Take your time with the planning, build in sections, invest in good slides, and always drill your pilot holes. Do that, and you’ll have a bed that works hard and looks great for years to come.